Sunday 29 January 2012


Report journal ledger
       Go to report menu bar and click on General ledger.
                                     
The new window is appeared on the screen.
                               
               In this window there is some option:
     General Ledger.
Ø               Financial Statements.
Ø               Inventory.
Ø              Job Report.
Ø             Account Reconciliation.
Ø             Time/Expense Report.
Ø             Company Reports.
Ø           Crystal Reports.
 When above window is opened General Ledger option is selected in Report. So  we double click on General Ledger in Report List.
 Here all general ledger information is given. If we want detail of any account then we double click on that specific account. E.g. we want to see detail of salary than we click on salary account
Click on Salary. Salary Window is appearing.
                                                         
Financial statements:
STEP1:
 We can select financial statements.
 We can select balance sheet, income statement, cash flow statement.
STEP2:
 When we click on income statement in report window. Income statement window is appeared than Click ‘’ok’’
 STEP3:
Final term income statement is appeared.
 STEP4:
We can get a report on excel for this we click on excel in menu bar. Copy Report to Excel Box is appeared. Then we click on OK.

Saturday 28 January 2012


Vendor Credit Memo
For preparing a vendor credit memo, first we go to task menu bar and click on Vendor credit memo, the new window will open.

Vendor credit window is appearing on the screen.

Now enter the vendor ID in the “Vendor ID” field then enter the date, reference no.
STEP2:
The “Terms” field will be automatically filled with the payment terms of the vendor.
STEP3:
Enter the Account Payable account number in the “A/P Account” field.Now, if there are any invoices pending on that vendor then “Apply to Invoice No.” tab will be activated.

STEP4:
Select the “Invoice no” from the drop down list on the Apply to Invoices tab.
STEP5:
 The Item field, Quantity field, Unit Price field and Description field will be written.
STEP6:
Enter the no. of items you want to return in the “Returned” field.

STEP7:
 Select the Inventory Account in the “GL Account” field.
STEP8:
The “Amount” field will be calculated by multiplying Returned field with the Unit Price field.
STEP9:
Now click on “Save” button.
                                         Credit Memo
STEP1:
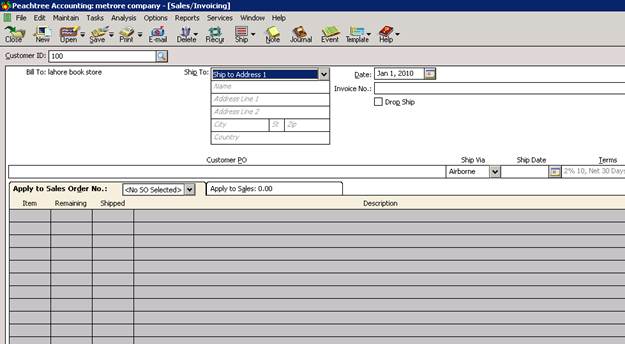
Go to task menu bar and click on Credit Memo.
The new window will be appear on the screen


STEP2:
 Enter the Customer ID.
STEP3:
Enter the date.
STEP4:
Enter the Reference no.
STEP5:
 The Terms field will be automatically filled with the payment terms of the Customer whose ID is enter, these are the terms that were selected when the Customer was created.
STEP6:
Enter the Customer Purchase Order No. Now, if there are any invoices pending on that Customer then “Apply to Invoice No.” tab will be activated, otherwise user can only enter returns in the “Apply to Sales” tab.

STEP7:
Select the “Invoice no” from the drop down list on the Apply to Invoices tab.
STEP8:
The Item field, Quantity field, Unit Price field and Description field will be written.
STEP9:
Enter the no. of items that are returned in the “Returned” field.
STEP10:
The “Amount” will be calculated by multiplying Returned field with the Unit Price field.
STEP11:
Click on “Save” button to save the credit memo.


Sunday 22 January 2012


Payments:
    First we go to task menu and select the payment option. The window appear on your screen

    After selecting the payment option the new window will be appear on the screen


   In first tab we will enter the 
   Vendor ID.
   Date.  
   Quantity. 
   Item.
   Description.
   GL account.
   Per unit.
   and then amount will be automatically calculated
   Then we click save button.


Thursday 12 January 2012


How to make a purchases/receiving inventory
It is used to enter the entries of purchases inventory.
First we go to the Task option on the menu bar and then select the purchases/Receiving inventory option.

After selecting the purchases inventory option, the window will be appeared on the screen.

Now we write the Vendor ID, Date, Invoice number and then we write the quantity, items, description, unit price and the total amount is automatically calculated.

Click Save option, purchase inventory will be saved.

How to make a purchase order
First we go to the ‘’Task Option’’ on the menu bar, than select the option of purchase order.

The window will be appeared on the screen.

Now following are the steps for making a purchase order.
Step1:
Select the vendor I.D.
Step 2:
Enter the date.
Step 3:
Enter the quantity, item, description, per unit then the amount will be automatically calculated.

Click the save button, the purchase order will be saved.


Thursday 5 January 2012


How to make sales receipt
. Click on the task menu and then select ‘’Receipts’’ as shown below in window.


After that, window will be appear on the screen


Enter the customer id and then write the reference number against which sale invoice is issued, and then write the receipt number.
‘’Receipt number is the amount we are receiving against this payment’’.
And then enter the quantity, Item description, date and the per unit price of product. Discount is automatically calculated be filled because of the date, Now click on pay box and then click save button.


Thursday 29 December 2011


Sales Invoice
Click on the “task menu” and then select sales/invoicing as shown below in window.
The window will be appearing on the screen.

After selecting ‘’Sales/invoicing’’, new window will be appearing on the screen


First we click on the search button for write a customer ‘’ID’’ the window is appear like this


Now we select the customer ID. After selecting ID the window will appear on the screen as

  
  Now we select the sales order number


And then again we write the quantity, description, and unit price. After write these information, Price will automatically calculated and enter the date on which you are making the invoice also give the invoice number and click on save.